

Your lead character looks right in the first clip. By scene four the face is rounder, the scarf is a different blue, and the ears sit higher. Viewers may not name the problem, but they feel it, and once they stop believing it is the same character, the story stops working.
Drift is rarely one big mistake. It builds up from small changes: a new seed for every generation, a camera angle the model has not seen for this character, different lighting, and a prompt reworded each time. Together they turn the character into someone else, and the usual fix is regenerating shots you thought were finished.
This guide walks through a workflow that prevents most drift before it starts and catches the rest early: lock the character, build a reference pack, carry the same identity into every shot, extend instead of regenerate, and review the cut shot by shot.
Key Takeaways
- Decide which traits are locked and which may change before you generate anything.
- Put every locked trait on a one-page character sheet and treat it as the source of truth.
- Build a small, curated reference pack and reject near-misses early.
- Reuse the same identity wording in every prompt; only the action and camera lines change.
- Storyboard in stills first, because drift is cheaper to fix in an image than in a video.
- Extend an existing clip when a shot needs to run longer, rather than generating a fresh one.
- Review the finished cut one shot at a time against the sheet, and log every drift with its likely cause.
Define What “the Same Character” Means
“Make her look the same” is not something you can check. A list of traits is.
Locked Traits vs. Flexible Traits
Split every character’s features into two groups.
Locked traits never change without a story reason: face shape, eye color and shape, skin tone or fur color, distinguishing marks, apparent age, hairline and hairstyle, and body build. If any of these move, the audience reads it as a different character.
Flexible traits are allowed to change from shot to shot: expression, pose, setting, time of day, and sometimes wardrobe. Wardrobe sits on the line: lock a signature costume item, or lock each outfit per scene if the character changes clothes.
Writing this split down tells you exactly what to check in review, and stops you wasting retakes on things that were never supposed to match.
A One-Page Character Sheet, With a Worked Example
Put the locked traits on a single page per character: three to five expressions, at least one front and one three-quarter full-body pose, a breakdown of costume and key features, and a named color palette.
Here is a worked example from a two-character preschool short. Pip the Puppy has creamy golden fur, honey-colored ear and eye patches, a white muzzle and chest, warm brown eyes, a black button nose, rounded paws with tan pads and a curled tail. His one costume item is a sky-blue neckerchief in wrinkled cotton, tied loosely. Teddy, his plush bear friend, is brown with a blue bow and is gentle, observant and a little more cautious than Pip. Each gets the same kind of sheet: labelled expressions, two body poses, costume detail and palette.
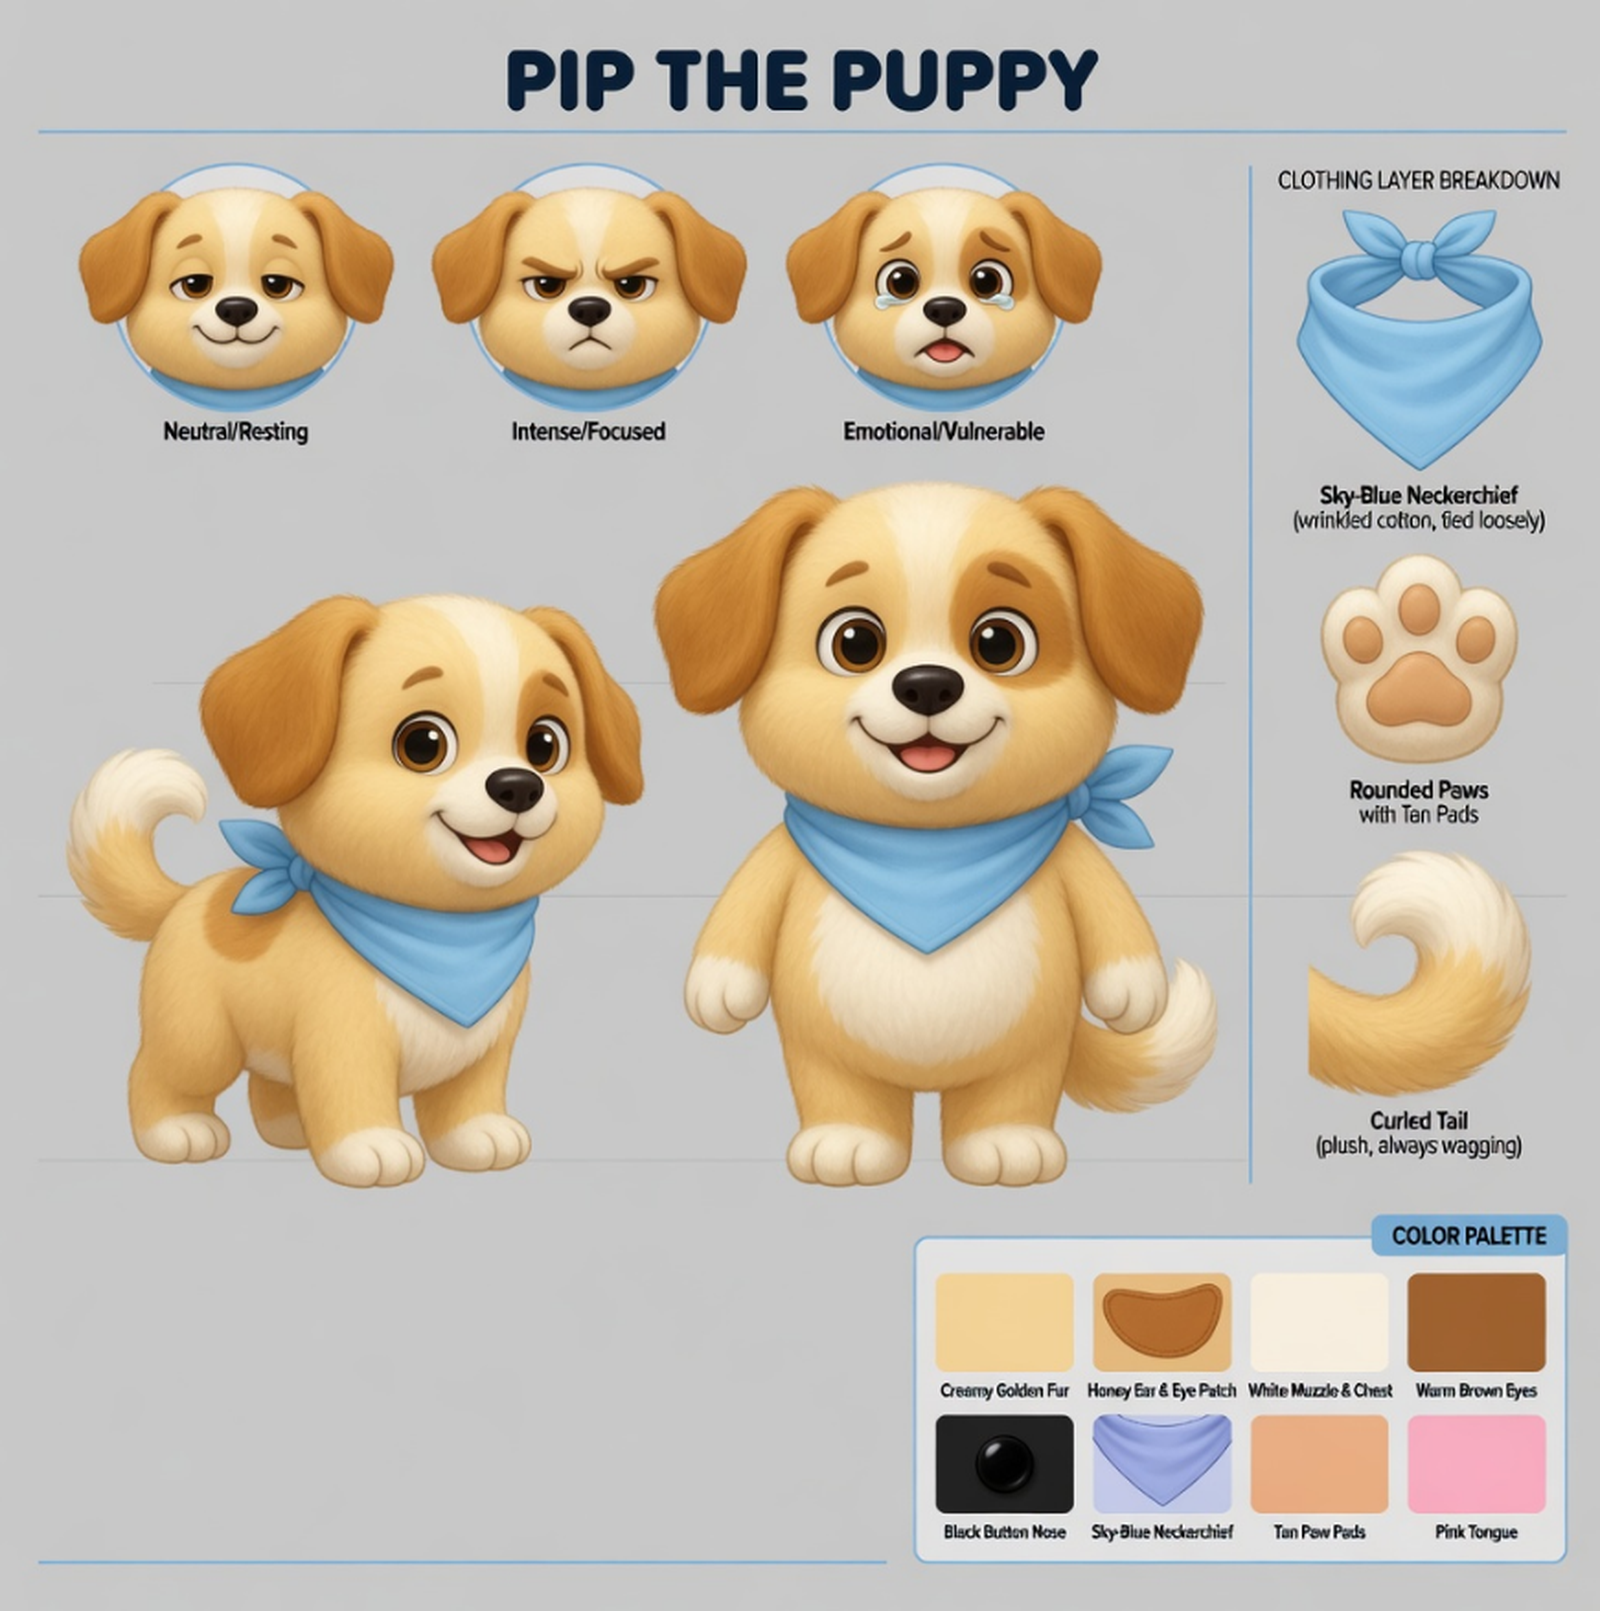
Figure 1. A character sheet locks expressions, poses, wardrobe and palette before any shot is made. Screenshot from GenFlick (“Puppy, Teddy & Bee” episode).
Naming the colors (“Sky-Blue Neckerchief” rather than “blue scarf”) matters: the name becomes the exact phrase you reuse in prompts and check in review.
Build a Reference Pack Before You Storyboard
The character sheet describes the character. The reference pack shows it from every angle the film will need.
Which Angles, Expressions and Lighting Setups to Create
Start from the shot list, not a generic set. If the film is mostly medium shots with a few close-ups, you need strong front and three-quarter views, a profile, and face close-ups in the main expressions.
For lighting, match the setups the film will actually use, such as daylight exterior, warm interior and night. A dozen strong images beats fifty mixed ones, because every weak image you keep is one the model may copy.
Keep the pack for the whole cast in one place, with each character’s sheet, bio and voice together, so every scene draws from the same set.
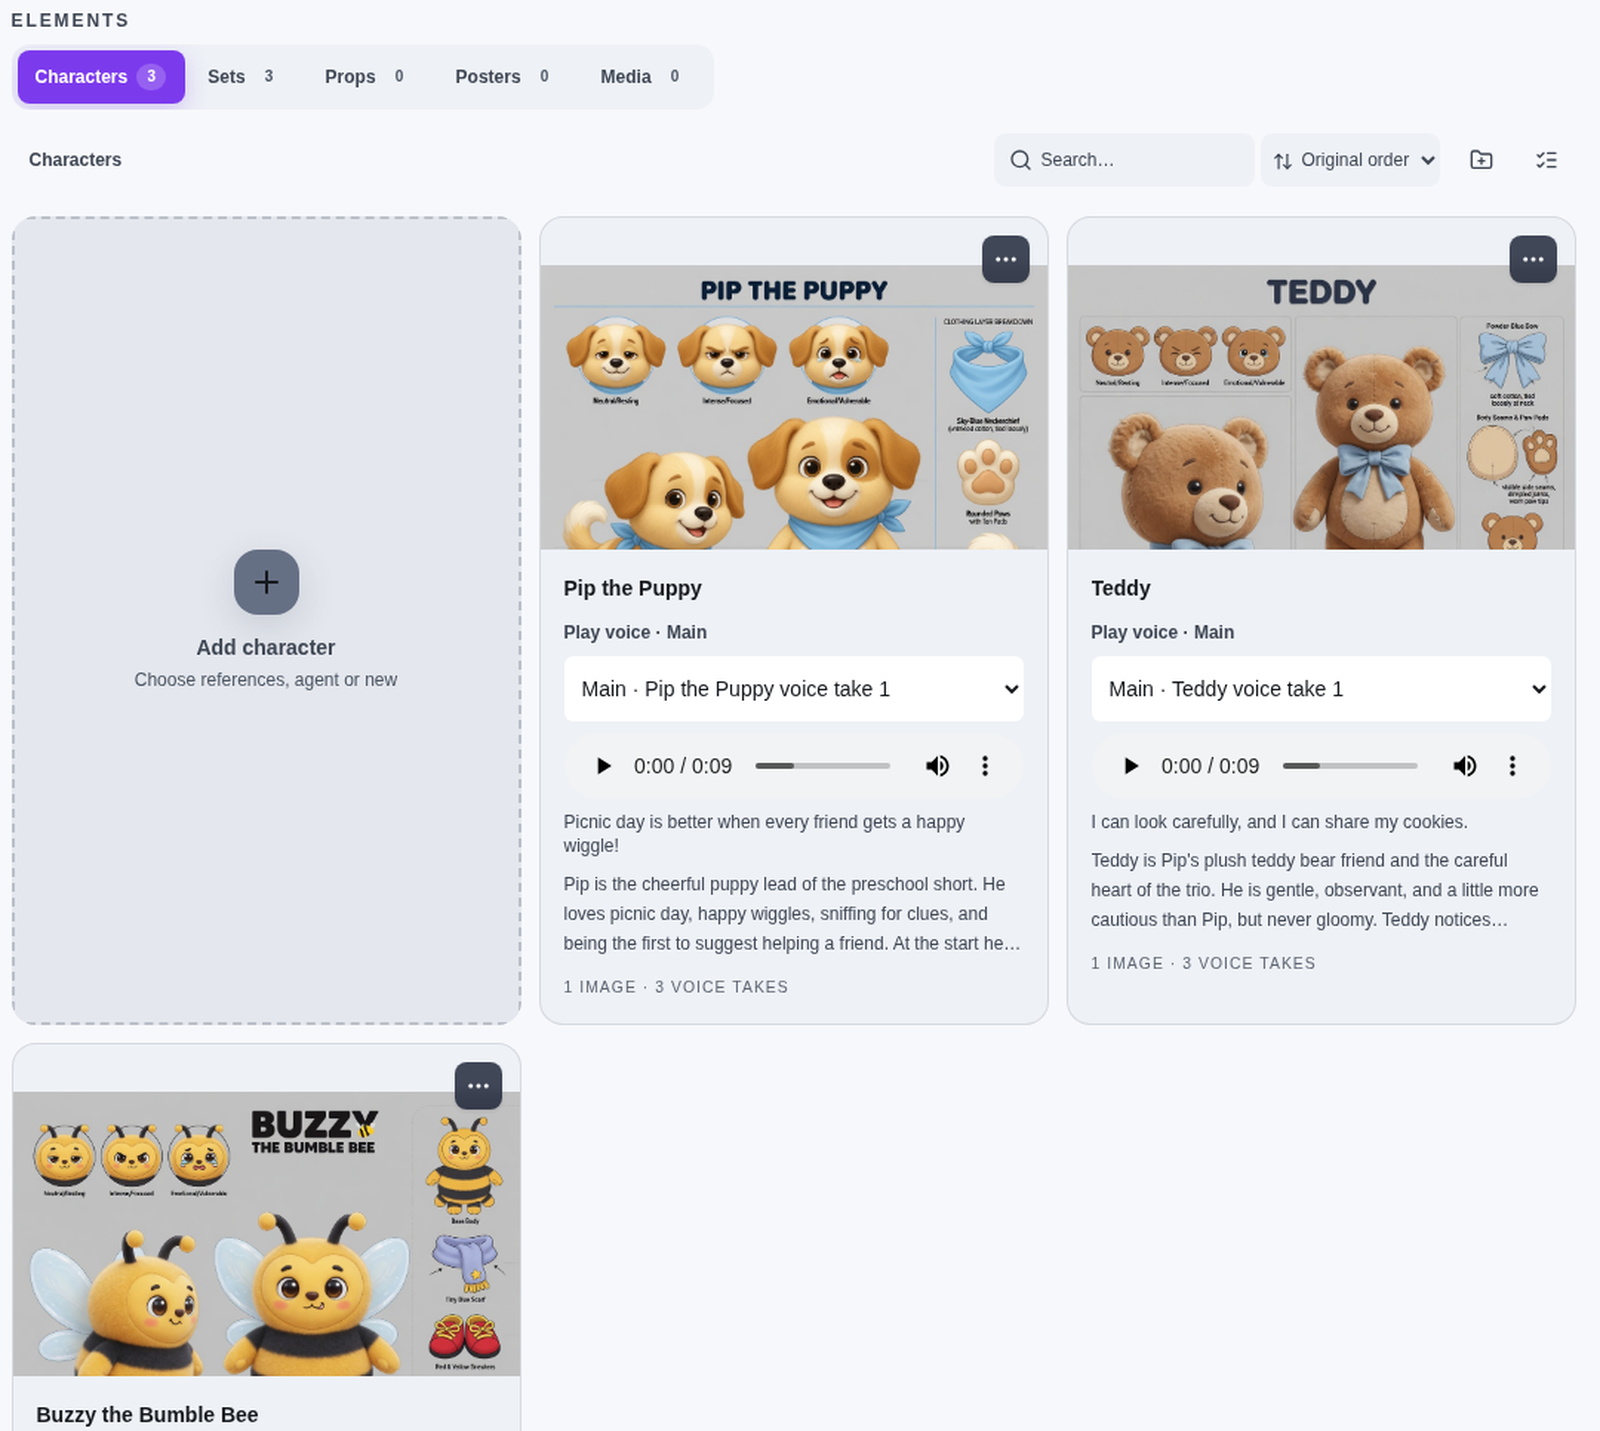
Figure 2. Each cast member gets a reference sheet and voice in one place, reused in every scene. Screenshot from GenFlick.
Curating References: Rejecting Near-Misses Early
The most dangerous reference is the one that is almost right. A Pip with slightly smaller ear patches will pass a quick glance, get used in a few shots, and pull later generations toward the wrong design.
Check every candidate against the sheet, trait by trait. If a locked trait is off, reject the image, even if it is the best-looking one you have.
Carry Identity Into Every Shot
A Fixed Identity Block Plus a Per-Shot Action Block
Split each prompt into two parts. The identity block is written once per character, copied word for word into every shot, and never edited on the fly. The action block changes per shot.
Identity block: “Pip, a small plush puppy with creamy golden fur, honey ear and eye patches, white muzzle and chest, warm brown eyes, black button nose, sky-blue cotton neckerchief tied loosely, curled tail.”
Action block: “Pip carries a wicker picnic basket across a red gingham blanket toward Teddy, tail wagging. Medium shot, eye level, warm afternoon sunlight.”
Paraphrasing the identity block (“golden puppy with a blue bandana”) invites drift. Each new wording is a new instruction that the model interprets fresh.
Keeping Camera and Lighting Language Small and Repeatable
Pick a small vocabulary for camera and light and use it the same way across the film: wide, medium and close-up; eye level and low angle; “warm afternoon sunlight” and “soft overcast light.” A short, repeated vocabulary keeps the look stable.
Storyboarding Every Frame First
Generate a still for every planned shot before any video. Drift shows up in stills too, and a still is much faster to redo. Lay the frames out in order and read them like a comic. If Pip’s ear patches change between frames three and four, fix the frame and the prompt now.
Extend Shots Instead of Regenerating Them
When a shot needs to run longer, the instinct is to generate a new, longer clip. That is often where a character breaks.
Why Continuing a Clip Holds a Face Better
A fresh generation reinterprets the character from your text and references. Extending a shot starts from frames you already approved, so the face, costume and lighting carry forward instead of being reinvented. You are asking the model to continue something that already looks right, not to recreate it.
In practice, you keep the clip you liked and continue it from a prompt describing what happens next. For example, GenFlick’s video extender continues an existing clip from a prompt, so you can add the next beat of action without starting the shot over.
Chaining Extensions and Checking the Join Frame
You can chain several extensions to build a longer shot, but check each join before you add the next one. Step through the frames either side of the join and compare the face, costume and lighting against the sheet. Small shifts at a join tend to grow with every extension added after it, so if one appears, go back to the last good frame and extend again from there rather than continuing from a drifted clip.
Shot-by-Shot Review
Watching the whole film once will not catch drift reliably, because your eye adjusts to gradual change.
Splitting the Cut and Comparing Each Shot
Break the cut into individual shots, grouped by scene, and review them one at a time with the character sheet open beside them. Check every locked trait: face shape, eyes, coloring, marks and costume. Then check the joins between consecutive shots, where a viewer is most likely to notice a jump.
In the example short, scene one has four clips of Pip and Teddy setting up a picnic, and scene two brings in Buzzy the Bumble Bee. Reviewing clip by clip confirms that Pip’s neckerchief and Teddy’s bow hold across both scenes.
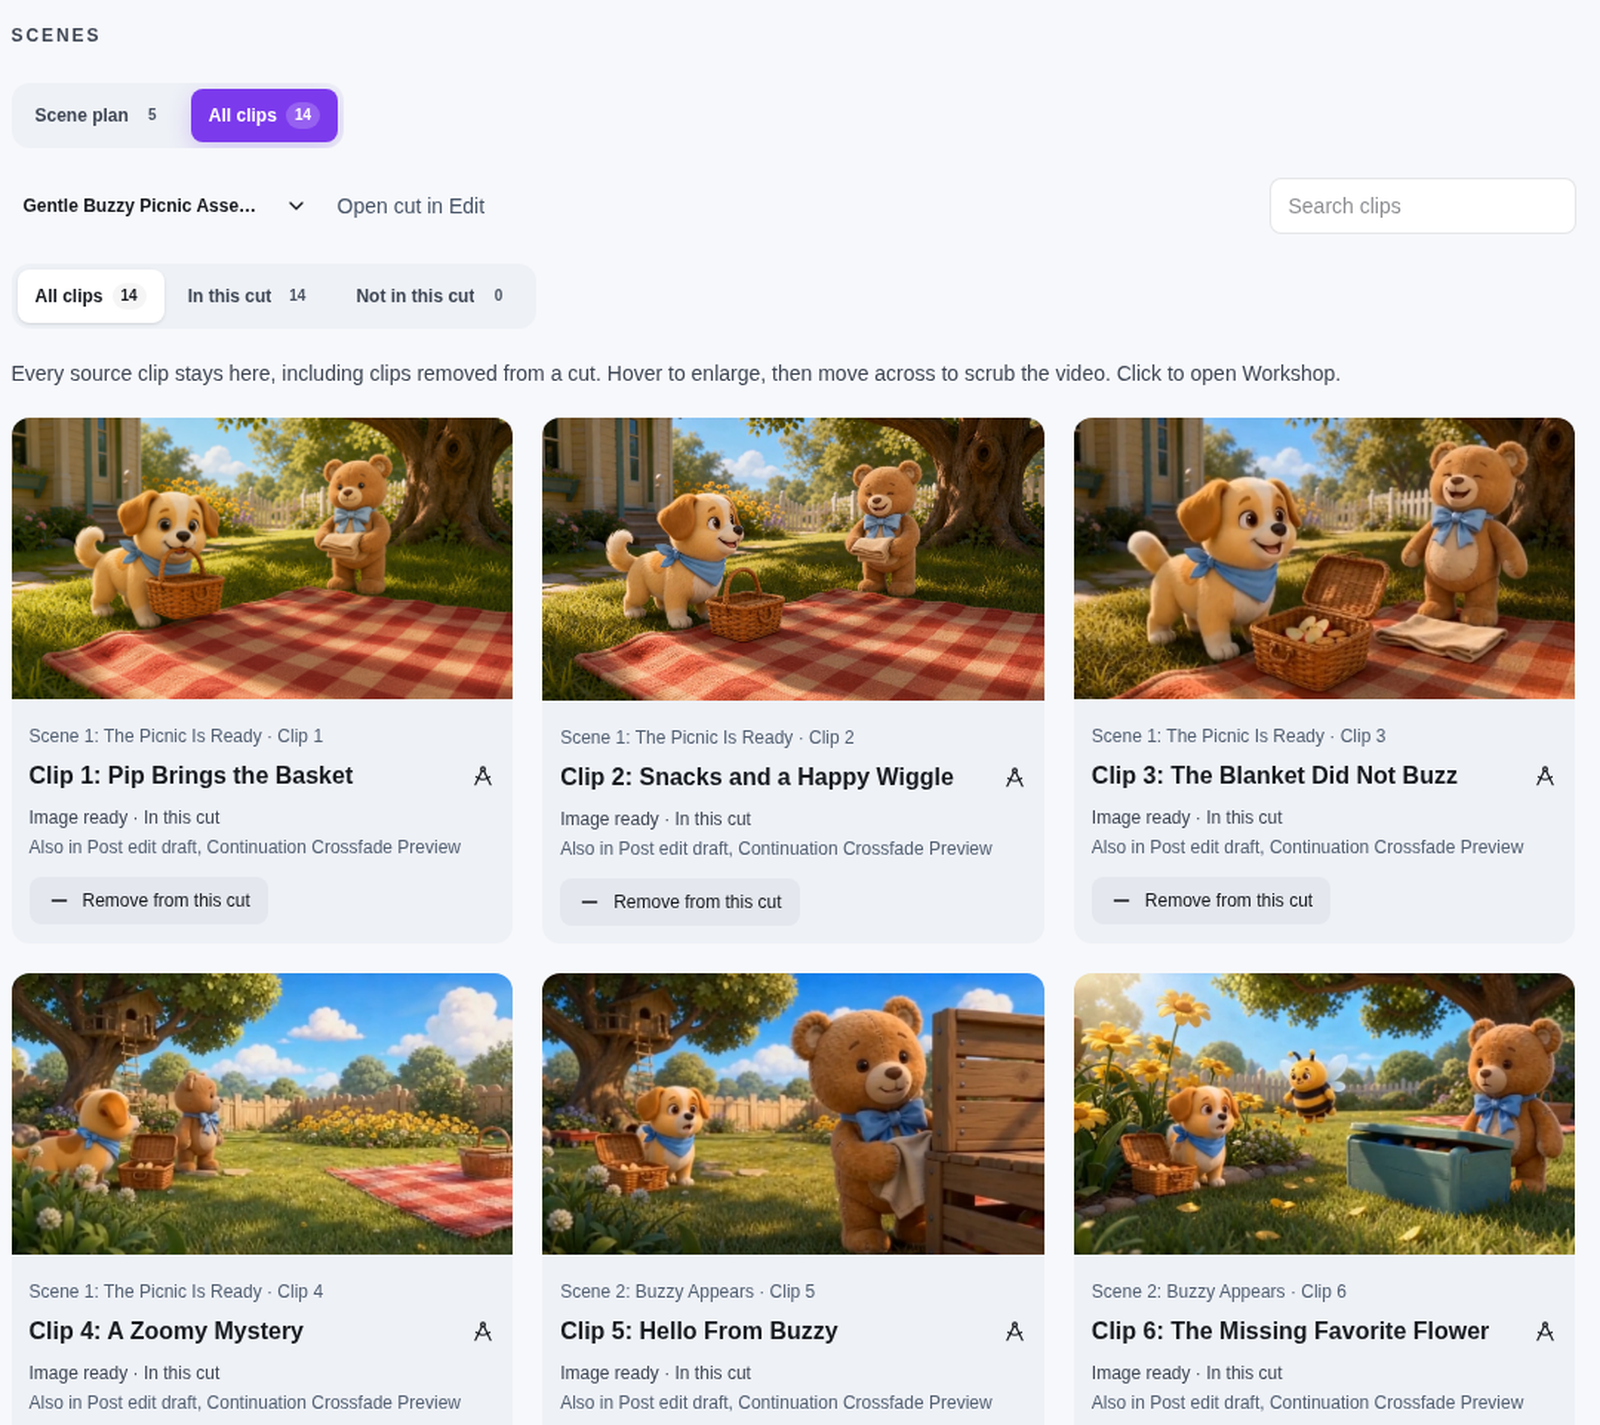
Figure 3. Reviewing shot by shot: the same cast holds up from clip to clip. Screenshot from GenFlick.
A Simple Drift Log
Keep a running log with three columns: what drifted, in which shot, and the likely cause. For example: “Pip’s ear patches lighter, scene 2 clip 6, lighting setup not in reference pack.” Patterns appear quickly. If most drift happens in night scenes, the pack needs night references.
Patch, Regenerate or Re-Plan
When an Edit Fix Is Enough
If the drift is small and brief, such as a slight color shift or one odd frame, fix it in the edit: a color correction, a trim, or a cutaway to the other character. If a locked trait is clearly wrong for more than a moment, regenerate the shot from the identity block and pack. If the same drift appears in several shots, the problem is upstream. Go back to the reference pack or sheet, fix the source, and only then regenerate the affected shots.
Keeping Voice and Wardrobe Continuity Too
Consistency is not only visual. Choose one voice take per character and reuse it in every scene. Treat wardrobe like the face: if an outfit changes, log it by scene so a costume does not swap back mid-sequence.
Frequently Asked Questions
How many reference images does one character need?
Enough to cover the angles, expressions and lighting in your shot list, and no more. For a short film, around a dozen strong, curated images per main character is a practical starting point.
Can I change a character’s outfit between scenes?
Yes. Lock each outfit per scene, give it its own sheet entry and prompt wording, and note the change in your drift log so reviewers know it is intentional.
Why does my character drift even with the same prompt?
The prompt is only one input. A new seed, an angle the references do not cover, or different lighting can all shift the result. Storyboarding in stills and extending approved clips both help.
Is it better to extend a clip or generate a new one?
When the next moment continues the same shot, extending usually holds the character better, because it starts from frames you have already approved. For a new angle or a new scene, generate fresh from your identity block and reference pack.
How do I keep two or more characters consistent in the same shot?
Give each character their own identity block and keep both blocks unchanged. In review, check each character separately against their own sheet, because one can drift while the other holds.
Conclusion: A Ten-Point Consistency Checklist
Run this before and after every scene:
- Every character has a written list of locked and flexible traits.
- Each character has a one-page sheet with expressions, poses, costume and a named palette.
- The reference pack covers the angles and lighting this scene uses.
- Near-miss references have been removed from the pack.
- Each prompt uses the identity block word for word.
- Camera and lighting wording comes from the film’s small, fixed vocabulary.
- Every shot was storyboarded as a still before video was generated.
- Longer shots were extended from approved clips, with every join checked.
- Each shot was reviewed one at a time against the sheet, and drift was logged with a cause.
- Voice takes and wardrobe match the previous scene.
Consistency is not a single setting. It comes from small habits applied to every shot, and the earlier you catch drift, the cheaper it is to fix.